额外配置 🚀
Footer 设置
since 是一个来展示你站点起始时间的选项。它位于页面的最底部。
# Footer Settings
# --------------------------------------
footer:
  owner:
    enable: true
    since: 2020
  custom_text:
  runtime:
    enable: true
    launch_time: 04/01/2021 00:00:00 # 网站上线时间
    work_img: https://npm.elemecdn.com/anzhiyu-blog@2.0.4/img/badge/安知鱼-上班摸鱼中.svg
    work_description: 距离月入25k也就还差一个大佬带我~
    offduty_img: https://npm.elemecdn.com/anzhiyu-blog@2.0.4/img/badge/安知鱼-下班啦.svg
    offduty_description: 下班了就该开开心心的玩耍,嘿嘿~
  # 徽标部分配置项 https://shields.io/
  # https://img.shields.io/badge/CDN-jsDelivr-orange?style=flat&logo=jsDelivr
  bdageitem:
    - link: https://hexo.io/ #徽标指向网站链接
      shields: https://npm.elemecdn.com/anzhiyu-blog@2.1.5/img/badge/Frame-Hexo.svg #徽标API
      message: 博客框架为Hexo_v5.4.0 #徽标提示语
    - link: https://hexo.anheyu.com/
      shields: https://pan.anheyu.com/d/anzhiyu/svg/Theme-AnZhiYu-2E67D3.svg
      message: 本站使用AnZhiYu主题
    - link: https://www.dogecloud.com/
      shields: https://npm.elemecdn.com/anzhiyu-blog@2.2.0/img/badge/CDN-多吉云-3693F3.svg
      message: 本站使用多吉云为静态资源提供CDN加速
    - link: https://github.com/
      shields: https://npm.elemecdn.com/anzhiyu-blog@2.1.5/img/badge/Source-Github.svg
      message: 本站项目由Github托管
    - link: http://creativecommons.org/licenses/by-nc-sa/4.0/
      shields: https://npm.elemecdn.com/anzhiyu-blog@2.2.0/img/badge/Copyright-BY-NC-SA.svg
message: 本站采用知识共享署名-非商业性使用-相同方式共享4.0国际许可协议进行许可| 参数 | 解释 |
|---|---|
| owner | 页脚网站所有者@2020-当前年份 |
| owner.enable | 页脚网站所有者是否启用 |
| owner.since | 页脚年份,控制台中打印的运行时间也来自这里 |
| runtime | 运行时间 |
| runtime.enable | 运行时间是否启用 |
| runtime.launch_time | 网站上线时间 |
| runtime.work_img | 页脚上班时间的徽标 |
| runtime.work_description | 页脚上班时间的 title 描述 |
| runtime.offduty_img | 页脚下班时间的徽标 |
| runtime.offduty_description | 页脚下班时间的 title 描述 |
| bdageitem | 徽标配置项 |
| bdageitem.link | 徽标配置链接 |
| bdageitem.shields | 徽标配置徽标 |
| bdageitem.message | 徽标配置徽标 title |


侧边栏设置
可自行决定哪个项目需要显示,可决定位置,也可以设置不显示侧边栏。
修改 主题配置文件
# aside (侧边栏)
# --------------------------------------

aside:
  enable: true
  hide: false
  button: true
  mobile: true # display on mobile
  position: right # left or right
  display: # 控制对应详情页面是否显示侧边栏
    archive: true
    tag: true
    category: true
  card_author:
    enable: true
    description: <div style="line-height:1.38;margin:0.6rem 0;text-align:justify;color:rgba(255, 255, 255, 0.8);">这有关于<b style="color:#fff">产品、设计、开发</b>相关的问题和看法,还有<b style="color:#fff">文章翻译</b>和<b style="color:#fff">分享</b>。</div><div style="line-height:1.38;margin:0.6rem 0;text-align:justify;color:rgba(255, 255, 255, 0.8);">相信你可以在这里找到对你有用的<b style="color:#fff">知识</b>和<b style="color:#fff">教程</b>。</div>
    name_link: /about
  card_announcement:
    enable: false
    content: 欢迎来看我的博客鸭~
  card_weixin:
    enable: true
    face: https://img02.anheyu.com/adminuploads/1/2022/09/11/631ddb7c9b250.png
    backFace: https://img02.anheyu.com/adminuploads/1/2022/09/11/631ddeb0900b7.png
  card_recent_post:
    enable: true
    limit: 5 # if set 0 will show all
    sort: date # date or updated
    sort_order: # Don't modify the setting unless you know how it works
  card_categories:
    enable: false
    limit: 8 # if set 0 will show all
    expand: none # none/true/false
    sort_order: # Don't modify the setting unless you know how it works
  card_tags:
    enable: true
    limit: 40 # if set 0 will show all
    color: false
    sort_order: # Don't modify the setting unless you know how it works
    highlightTags:
      - Hexo
      - 前端
  card_archives:
    enable: true
    type: monthly # yearly or monthly
    format: MMMM YYYY # eg: YYYY年MM月
    order: -1 # Sort of order. 1, asc for ascending; -1, desc for descending
    limit: 8 # if set 0 will show all
    sort_order: # Don't modify the setting unless you know how it works
  card_webinfo:
    enable: true
    post_count: true
    last_push_date: false
sort_order: # Don't modify the setting unless you know how it works其中 card_weixin 可以控制微信公众号的图片,face为翻转前的图片,backFace为翻转后的图片。
访问人数 busuanzi
访问 busuanzi 的官方网站查看更多的介绍。
修改 主题配置文件
busuanzi:
  site_uv: true
  site_pv: true
page_pv: true如果需要修改 busuanzi 的 CDN 链接,可通过 主题配置文件 的 CDN 中的 option 进行修改
CDN:
  option:
  	busuanzi: xxxxxxxxx

运行时间
网页已运行时间
修改 主题配置文件
# Time difference between publish date and now (网页运行时间)
# Formal: Month/Day/Year Time or Year/Month/Day Time
runtimeshow:
  enable: true
  publish_date: 4/1/2021 00:00:00
最新评论
最新评论只会在刷新时才会去读取,并不会实时变化
由于 API 有 访问次数限制,为了避免调用太多,主题默认存取期限为 10 分钟。也就是説,调用后资料会存在 localStorage 里,10 分钟内刷新网站只会去 localStorage 读取资料。 10 分钟期限一过,刷新页面时才会去调取 API 读取新的数据。( 配置 storage,可自行配置缓存时间)
在侧边栏显示最新评论板块
修改 主题配置文件
# Console - Newest Comments
newest_comments:
  enable: true
  sort_order: # Don't modify the setting unless you know how it works
  limit: 6
  storage: 10 # unit: mins, save data to localStorage
avatar: true| 配置 | 解释 |
|---|---|
| limit | 显示的数量 |
| storage | 设置缓存时间,单位 分钟 |
| avatar | 是否显示头像 |

右下角按钮
简繁转换
简体繁体互换
右下角会有简繁转换按钮。
修改 主题配置文件
translate:
  enable: true
  # 默认按钮显示文字(网站是简体,应设置为'default: 繁')
  default: 简
  #网站默认语言,1: 繁体中文, 2: 简体中文
  defaultEncoding: 1
  #延迟时间,若不在前, 要设定延迟翻译时间, 如100表示100ms,默认为0
  translateDelay: 0
  #当文字是简体时,按钮显示的文字
  msgToTraditionalChinese: "繁"
  #当文字是繁体时,按钮显示的文字
msgToSimplifiedChinese: "简"简体

繁体

阅读模式
阅读模式下会去掉除文章外的内容,避免干扰阅读。
只会出现在文章页面,右下角会有阅读模式按钮。
修改 主题配置文件
readmode: true
夜间模式
右下角会有夜间模式按钮
修改 主题配置文件
# dark mode
darkmode:
  enable: true
  # Toggle Button to switch dark/light mode
  button: true
  # Switch dark/light mode automatically (自动切换 dark mode和 light mode)
  # autoChangeMode: 1  Following System Settings, if the system doesn't support dark mode, it will switch dark mode between 6 pm to 6 am
  # autoChangeMode: 2  Switch dark mode between 6 pm to 6 am
  # autoChangeMode: false
  autoChangeMode: 1
  # Set the light mode time. The value is between 0 and 24. If not set, the default value is 6 and 18
  start: # 8
end: # 22| 参数 | 解释 |
|---|---|
| button | 是否在右下角显示日夜模式切换按钮 |
| autoChangeMode | 自动切换的模式 |
| autoChangeMode | autoChangeMode: 1 跟随系统而变化,不支持的浏览器/系统将按照时间 start 到 end 之间切换为 light mode autoChangeMode: 2 只按照时间 start 到 end 之间切换为 light mode ,其余时间为 dark mode autoChangeMode: false 取消自动切换 |
| start | light mode 的开始时间 |
| end | light mode 的结束时间 |
按钮排序
# Don't modify the following settings unless you know how they work (非必要请不要修改 )
# Choose: readmode,translate,darkmode,hideAside,toc,chat,comment
# Don't repeat 不要重复
rightside_item_order:
  enable: false
  hide: # readmode,translate,darkmode,hideAside
show: # toc,chat,comment短标签 Tag Plugins
TIP
短标签是 Hexo 独有的功能,并不是标准的 Markdown 格式。 以下的写法,只适用于 AnZhiYu 主题,用在其它主题上不会有效果,甚至可能会报错。使用前请留意
WARNING
短标签虽然能为主题带来一些额外的功能和 UI 方面的强化,但是,短标签也有明显的限制,使用时请留意。
只需要将标签写在 md 文件内即可使用,详细写法请阅读 安知鱼主题标签 Tag Plugins 查看
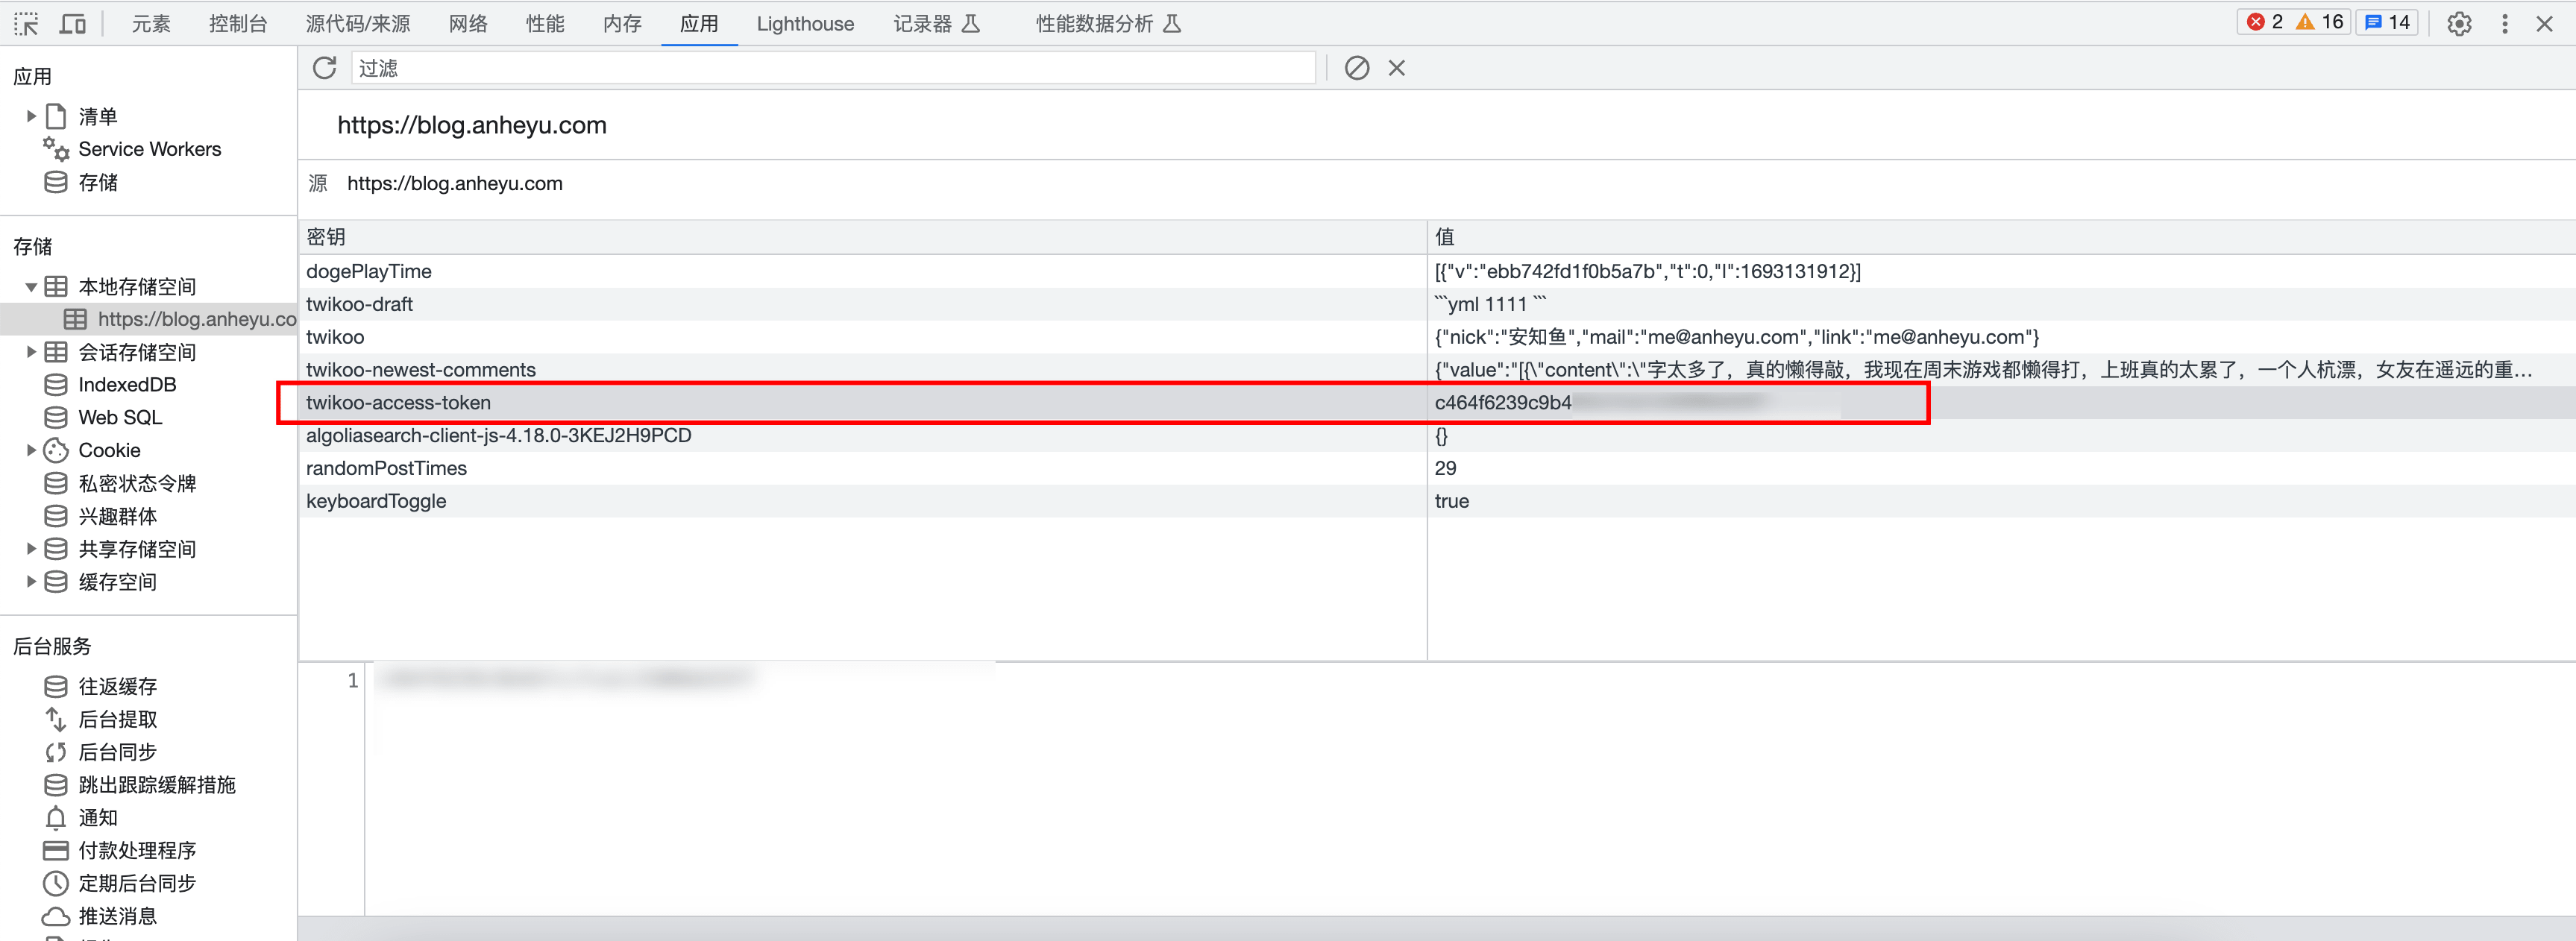
评论弹幕
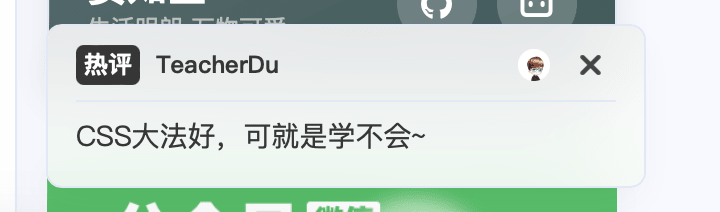
评论弹幕仅支持 Twikoo。
token 在你博客的控制台获取,打开浏览器开发者工具,找到本地存储空间,找到键名为twikoo-access-token的内容,将值复制下来填写即可,本方法仅限 server 部署,其他部署方案请自行查看如何获取 token。
# 留言弹幕配置
comment_barrage_config:
  enable: true
  # 同时最多显示弹幕数
  maxBarrage: 1
  # 弹幕显示间隔时间ms
  barrageTime: 8000
  # token
  accessToken: "xxxxxx"
  # 博主邮箱md5值
mailMd5: "xxxxxxxxxx"分析统计
百度统计
登录百度统计的官方网站
找到你百度统计的统计代码

- 修改
主题配置文件
baidu_analytics: 你的代码谷歌分析
登录谷歌分析的官方网站
找到你的谷歌分析的跟踪 ID

- 修改
主题配置文件
google_analytics: 你的代码 # 通常以`UA-`打头Cloudflare
- 登录 Cloudflare 分析的官方网站
- 找到
JavaScript 程式码片段 - 找到你的
token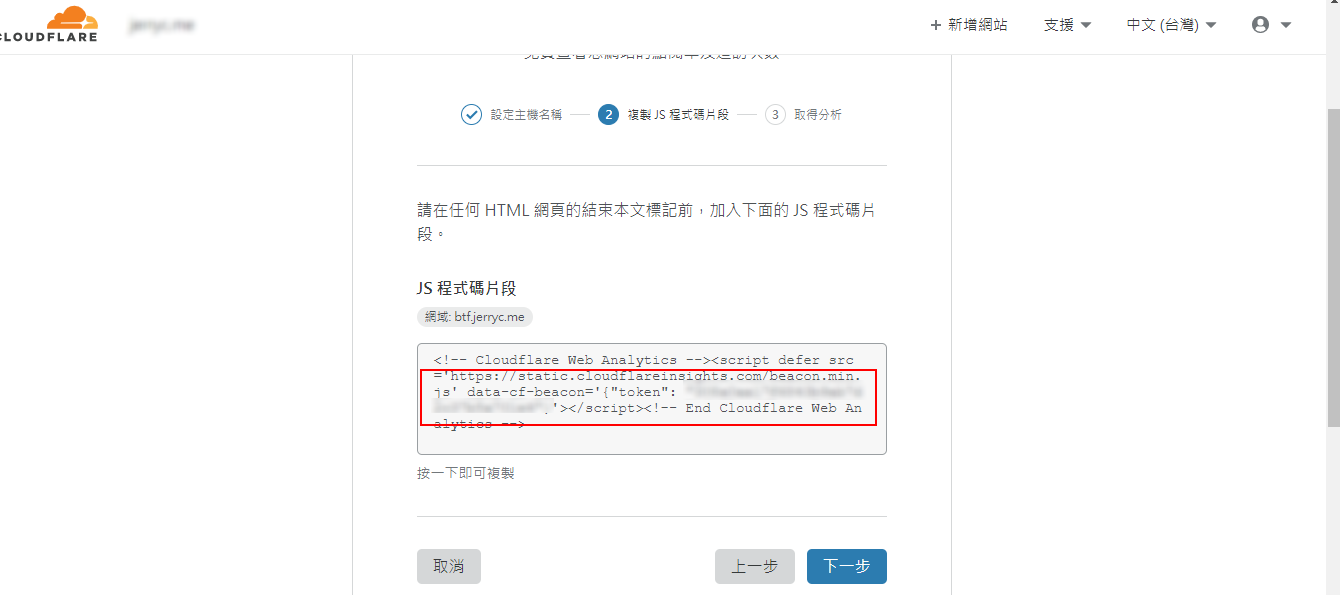
- 修改
主题配置文件
# Cloudflare Analytics
# https://www.cloudflare.com/zh-tw/web-analytics/
cloudflare_analytics:Microsoft Clarity
登录 Clarity 的官方网站
创建
PROJECT找到你的
ID
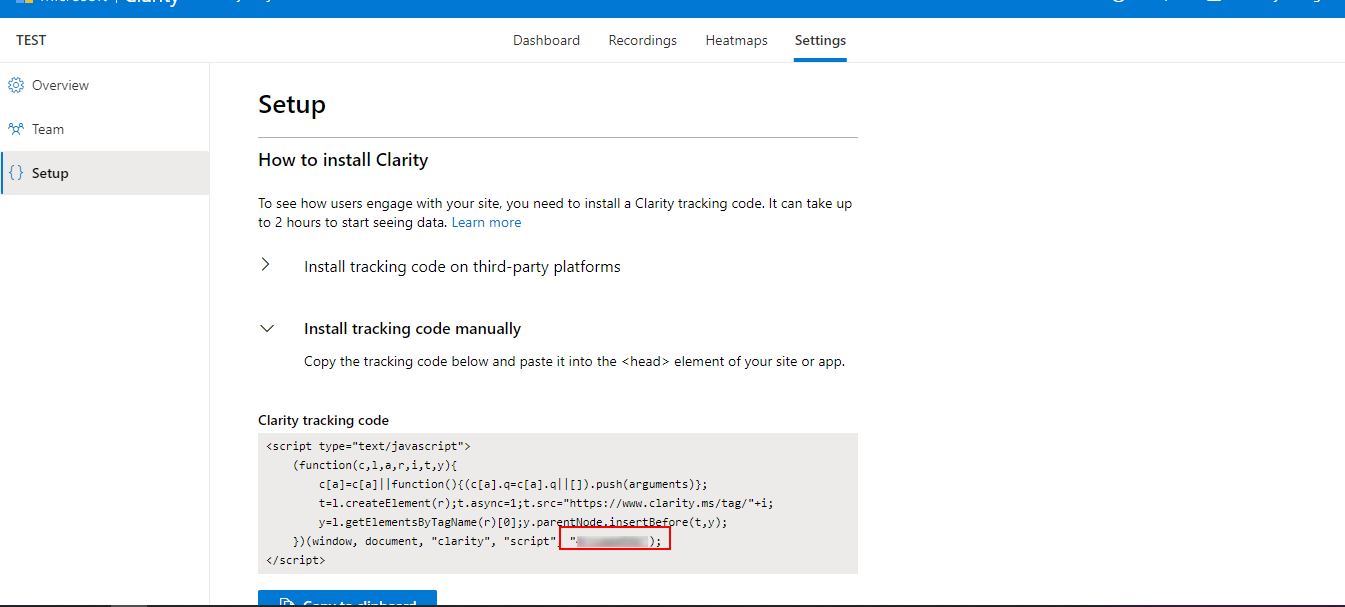
- 修改
主题配置文件
# Microsoft Clarity
# https://clarity.microsoft.com/
microsoft_clarity:广告
谷歌广告
主题已集成谷歌广告(自动广告)
修改 主题配置文件
google_adsense:
  enable: true
  auto_ads: true
  js: https://pagead2.googlesyndication.com/pagead/js/adsbygoogle.js
  client: # 填入个人识别码
  enable_page_level_ads: true
手动广告配置
主题预留了三个位置可供插入广告,分别为主页文章(每三篇文章出现广告)/aside 公告之后/文章页打赏之后。 把 html 代码填写到对应的位置
修改 主题配置文件
ad:
  index:
  aside:
post:例如:
index: <ins class="adsbygoogle" style="display:block" data-ad-format="fluid" data-ad-layout-key="xxxxxxxxxxxx" data-ad-client="ca-pub-xxxxxxxxxx" data-ad-slot="xxxxxxxxxx"></ins><script>(adsbygoogle=window.adsbygoogle||[]).push({})</script>页面加载动画
当进入网页时,因为加载速度的问题,可能会导致 top_img 图片出现断层显示,或者网页加载不全而出现等待时间,开启 preloader 后,会显示加载动画,等页面加载完,加载动画会消失。
主题支持 pace.js 的加载动画,具体可查看 pace.js
修改 主题配置文件,其中avatar可以自定义加载时的头像
# Loading Animation (加载动画)
preloader:
  enable: true
  # source
  # 1. fullpage-loading
  # 2. pace (progress bar)
  # else all
  source: 3
  # pace theme (see https://codebyzach.github.io/pace/)
  pace_css_url:
avatar: # 自定义头像图片大图查看模式
WARNING
如果你并不想为某张图片添加大图查看模式,你可以使用 html 格式引用图片,併为图片添加 no-lightbox class 名。
修改 主题配置文件
# fancybox http://fancyapps.com/fancybox/3/
fancybox: truemedium_zoom: truePjax
当用户点击链接,通过 ajax 更新页面需要变化的部分,然后使用 HTML5 的 pushState 修改浏览器的 URL 地址。
这样可以不用重复加载相同的资源(css/js), 从而提升网页的加载速度。
# Pjax [Beta]
# It may contain bugs and unstable, give feedback when you find the bugs.
# https://github.com/MoOx/pjax
pjax:
  enable: true
  exclude:
    - /music/
- /no-pjax/TIP
对于一些第三方插件,有些并不支持 pjax 。 你可以把网页加入到 exclude 里,这个网页会被 pjax 排除在外。 点击该网页会重新加载网站
使用 pjax 后,一些自己 DIY 的 js 可能会无效,跳转页面时需要重新调用,请参考Pjax 文档
使用 pjax 后,一些个别页面加载的 js/css,将会改为所有页面都加载
WARNING
主题默认开启 Pjax,大量服务依赖于 pjax,关闭可能会造成破坏性问题。 主题对 pjax 做了深度适配,关闭可能会造成严重的后果,比如某些链接无法跳转。
安知鱼主题的的 Pjax 目前仍有一些问题,请留意
使用谷歌广告可能会报错(例如自动广告) 如果你在使用中发现问题,欢迎反馈 Bugs
Snackbar 弹窗
Snackbar 弹窗,根据自己爱好开启
修改 主题配置文件
# Snackbar 弹窗
# https://github.com/polonel/SnackBar
# position 弹窗位置
# 可选 top-left / top-center / top-right / bottom-left / bottom-center / bottom-right
snackbar:
  enable: true
  position: bottom-left
  bg_light: "#49b1f5" #light mode时弹窗背景
bg_dark: "#2d3035" #dark mode时弹窗背景Pangu
如果你跟我一样,每次看到网页上的中文字和英文、数字、符号挤在一块,就会坐立难安,忍不住想在它们之间加个空格。这个外挂正是你在网路世界走跳所需要的东西,它会自动替你在网页中所有的中文字和半形的英文、数字、符号之间插入空白。
修改 主题配置文件
# https://github.com/vinta/pangu.js
# Insert a space between Chinese character and English character (中英文之间添加空格)
pangu:
  enable: false
field: post # site/postfield只支持两个参数,post(只在文章页生效)和site(全站生效)
PWA
PWA 是 web 优化的一种手段,主题做了一定的适配,但是依然需要进行配置。要为 AnZhiYu 配上 PWA 特性, 你可以进行选择以下两种方式来进行适配,hexo-offline适合初学者,hexo-swpp适合已经对service worker有一定解决问题能力的进阶使用。
hexo-offline
- 打开 hexo 工作目录
npm install hexo-offline --save或者yarn add hexo-offline- 在根目录创建
hexo-offline.config.cjs文件,并增加以下内容。
// offline config passed to workbox-build.
module.exports = {
  // 静态文件合集,如果你的站点使用了例如 webp 格式的文件,请将文件类型添加进去。
  globPatterns: ["404.html", "css/index.css"],
  globDirectory: "public",
  swDest: "public/service-worker.js",
  maximumFileSizeToCacheInBytes: 10485760, // 缓存的最大文件大小,以字节为单位。
  skipWaiting: true,
  clientsClaim: true,
  runtimeCaching: [
    // 如果你需要加载 CDN 资源,请配置该选项,如果没有,可以不配置。
    // CDNs - should be CacheFirst, since they should be used specific versions so should not change
    {
      urlPattern: /^https:\/\/npm\.elemecdn\.com\/anzhiyu-blog/, // 缓存elmentcdn
      handler: "CacheFirst",
    },
  ],
  manifestTransforms: [
    async (manifestEntries, compilation) => {
      const timestamp = new Date().toISOString().replace(/[-:.TZ]/g, ""); // 获取当前时间戳
      manifestEntries.push(
        {
          url: "/",
          revision: `index-${timestamp}`,
        },
        {
          url: "music/",
          revision: `music-${timestamp}`,
        },
        {
          url: "about/",
          revision: `about-${timestamp}`,
        }
      );
      return { manifest: manifestEntries };
    },
  ],
};更多内容请查看 hexo-offline 的官方文档
- 在
主题配置文件中开启 pwa 选项。
# PWA
# See https://github.com/JLHwung/hexo-offline
# ---------------
pwa:
  enable: true
  startup_image_enable: true
  manifest: /manifest.json
  theme_color: var(--anzhiyu-main)
  mask_icon: /img/siteicon/apple-icon-180.png
  apple_touch_icon: /img/siteicon/apple-icon-180.png
  bookmark_icon: /img/siteicon/apple-icon-180.png
  favicon_32_32: /img/siteicon/32.png
favicon_16_16: /img/siteicon/16.png- 在创建
source/目录中创建manifest.json文件。
{
  "name": "安知鱼`Blog",
  "short_name": "安知鱼",
  "theme_color": "#3b70fc",
  "background_color": "#3b70fc",
  "display": "fullscreen",
  "scope": "/",
  "start_url": "/",
  "id": "/",
  "icons": [
    {
      "src": "img/siteicon/manifest-icon-192.maskable.png",
      "sizes": "192x192",
      "type": "image/png",
      "purpose": "any"
    },
    {
      "src": "img/siteicon/manifest-icon-192.maskable.png",
      "sizes": "192x192",
      "type": "image/png",
      "purpose": "maskable"
    },
    {
      "src": "img/siteicon/manifest-icon-512.maskable.png",
      "sizes": "512x512",
      "type": "image/png",
      "purpose": "any"
    },
    {
      "src": "img/siteicon/manifest-icon-512.maskable.png",
      "sizes": "512x512",
      "type": "image/png",
      "purpose": "maskable"
    }
  ],
  "splash_pages": null
}你也可以通过 Web App Manifestopen 快速创建manifest.json。(Web App Manifest 要求至少包含一个 512*512 像素的图标)
- 可以通过
Chrome插件Lighthouse检查 PWA 配置是否生效以及配置是否正确。
- 打开博客页面
- 启动
Lighthouse插件 (Lighthouse 插件要求至少包含一个 512*512 像素的图标)
关于 PWA(渐进式增强 Web 应用)的更多内容请参考 Google Tools for Web Developersopen
- 生成 pwa 启动图
- 安装 pwa-asset-generator,执行以下命令bash
npm install pwa-asset-generator - hexo 根目录执行
hexo g后执行以下命令bashnpx pwa-asset-generator ./public/img/512.png ./public/img/siteicon --padding "calc(50vh - 20%) calc(50vw - 40%)" -s false -h true - 这条命令会使用
themes/source/img/512.png这张图片来生成 siteicon 到目录/public/img/siteicon中,由于hexo cl会清除/public目录中的文件,所以每次hexo d之前都需要执行,如果不想每次hexo d之前都执行的话,可以将主题中的themes/source/img/512.png图片复制移动到根目录/source/img中,然后将生成后的/public/img/siteicon文件夹复制到根目录/source/img中,这样根目录/source/img中就会一直有siteicon,以后执行hexo g时,也会将siteicon生成到public目录中。
hexo-swpp
主题版本大于 1.5.2 支持,这种加载办法为极其迅速,由 sw 控制其缓存,实现原理以及配置请查看以下三篇文章
配置方法:
安装 hexo-swpp 插件和 swpp-backends,在博客根目录执行
bashnpm install hexo-swpp --save npm install swpp-backends --save在
主题配置文件中开启 pwa 选项。yaml# PWA # See https://github.com/JLHwung/hexo-offline # --------------- pwa: enable: true startup_image_enable: true manifest: /manifest.json theme_color: var(--anzhiyu-main) mask_icon: /img/siteicon/apple-icon-180.png apple_touch_icon: /img/siteicon/apple-icon-180.png bookmark_icon: /img/siteicon/apple-icon-180.png favicon_32_32: /img/siteicon/32.png favicon_16_16: /img/siteicon/16.png在 hexo 的配置文件中添加如下内容即可启用插件:
ymlswpp: # 是否启用插件 enable: true # 是否在发布前自动执行脚本 # auto_exec: true在创建
source/目录中创建manifest.json文件。json{ "name": "安知鱼`Blog", "short_name": "安知鱼", "theme_color": "#3b70fc", "background_color": "#3b70fc", "display": "fullscreen", "scope": "/", "start_url": "/", "id": "/", "icons": [ { "src": "img/siteicon/manifest-icon-192.maskable.png", "sizes": "192x192", "type": "image/png", "purpose": "any" }, { "src": "img/siteicon/manifest-icon-192.maskable.png", "sizes": "192x192", "type": "image/png", "purpose": "maskable" }, { "src": "img/siteicon/manifest-icon-512.maskable.png", "sizes": "512x512", "type": "image/png", "purpose": "any" }, { "src": "img/siteicon/manifest-icon-512.maskable.png", "sizes": "512x512", "type": "image/png", "purpose": "maskable" } ], "splash_pages": null }你也可以通过 Web App Manifestopen 快速创建
manifest.json。(Web App Manifest 要求至少包含一个 512*512 像素的图标)可以通过
Chrome插件Lighthouse检查 PWA 配置是否生效以及配置是否正确。 打开博客页面启动Lighthouse插件 (Lighthouse 插件要求至少包含一个 512*512 像素的图标) 关于 PWA(渐进式增强 Web 应用)的更多内容请参考 Google Tools for Web Developersopen生成 pwa 启动图 安装
pwa-asset-generatorbashnpm install pwa-asset-generatorhexo 根目录执行
hexo g然后执行
npx pwa-asset-generator ./public/img/512.png ./public/img/siteicon --padding "calc(50vh - 20%) calc(50vw - 40%)" -s false -h true这条命令会使用themes/anzhiyu/source/img/512.png这张图片来生成 siteicon 到目录/public/img/siteicon中,由于hexo cl会清除/public目录中的文件,所以每次hexo d之前都需要执行,如果不想每次hexo d之前都执行的话,可以将主题中的themes/anzhiyu/source/img/512.png图片复制移动到根目录``/source/img中,然后将生成后的/public/img/siteicon文件夹复制到根目录``/source/img中,这样根目录``/source/img中就会一直有siteicon,以后执行hexo g时,也会将siteicon生成到public目录中。
在 hexo g 以后执行一次 hexo swpp 命令 如果你的网站使用了 CDN 且启用了 CDN 端缓存,请务必将 CDN 缓存时间调整至最大值,然后每次更新网页内容后手动刷新 CDN 缓存。 因为本插件的更新方案要求
update.json更新时,其它所有需要更新的资源均已更新,否则客户端拉取时会误以为拉取到了最新的内容,从而导致部分资源“错过”更新。 简而言之,就是update.json必须与需要缓存的资源共享同样的 CDN 缓存周期,但是目前市面上我知道的 CDN 无法做到这一点,所以只能从下列选项中二选一- 把所有资源的 CDN 缓存时间拉满,每次更新网站时刷新 CDN 缓存
- CDN 不缓存所有需要在客户端缓存的资源
Netlify 构建后自动刷新 CDN 缓存的教程见:《全自动博客部署方案》 请务必注意 CDN 缓存的问题!!! 默认主题将只缓存 404 和 index.css 如果你需要配置自己的缓存策略,请在博客根目录新建
sw-rules.js请注意 ⚠️ 定期或不定期检查 hexo swpp 是否存在更新,以及查看更新日志对配置做出最新的更改
WARNING
主题默认内置了一份 sw-rules.js 规则,位于themes/anzhiyu/sw-rules.js可以开箱即用,如需自定义缓存规则可以复制该文件至 hexo 根目录然后修改根目录的 sw-rules.js。
- 安知鱼主题适配 hexo-swpp3.2+,swpp-backends2.0+更多内容请参考 Swpp Backends 官方文档hexo-swppswpp-backends解剖 SW 原理暨博主 SW 实现小白也能用的 SW 构建插件
Open Graph
在 head 里增加一些 meta 资料,例如缩略图、标题、时间等等。当你分享网页到一些平台时,平台会读取 Open Graph 的内容,展示缩略图,标题等等信息。
修改 主题配置文件
# Open graph meta tags
# https://developers.facebook.com/docs/sharing/webmasters/
Open_Graph_meta:
  enable: true
  option:
    # twitter_card:
    # twitter_image:
    # twitter_id:
    # twitter_site:
    # google_plus:
    # fb_admins:
# fb_app_id:CSS 前缀
有些 CSS 并不是所有浏览器都支持,需要增加对应的前缀才会生效。
开启 css_prefix 后,会自动为一些 CSS 增加前缀。(会增加 20%的体积)
修改 主题配置文件
# Add the vendor prefixes to ensure compatibility
css_prefix: trueInject
如想添加额外的 js/css/meta 等等东西,可以在 Inject 里添加,支持添加到 head(</body>标签之前)和 bottom(</html>标签之前)。
请注意:以标准的 html 格式添加内容
inject:
  head:
  	- <link rel="stylesheet" href="/self.css">
  bottom:
- <script src="xxxx"></script>留意: 如果你的网站根目录不是'/',使用本地图片时,需加上你的根目录。
例如:网站是 https://yoursite.com/blog,引用css/xx.css,则设置为<link rel="stylesheet" href="/blog/css/xx.css">
CDN
配置文件中最后一部分 CDN,里面是主题所引用到的文件,可自行配置 CDN。(非必要请勿修改,配置后请确认链接是否能访问)
# CDN
# Don't modify the following settings unless you know how they work
# 非必要请不要修改
CDN:
  # The CDN provider of internal scripts (主题内部 js 的 cdn 配置)
  # option: local/elemecdn/jsdelivr/unpkg/cdnjs/custom
  # Dev version can only choose. ( dev版的主题只能设置为 local )
  internal_provider: cbd

  # The CDN provider of third party scripts (第三方 js 的 cdn 配置)
  # option: elemecdn/jsdelivr/unpkg/cdnjs/custom
  third_party_provider: cbd

  # Add version number to CDN, true or false
  version: true

  # Custom format
  # For example: https://cdn.staticfile.org/${cdnjs_name}/${version}/${min_cdnjs_file}
  custom_format: # https://npm.elemecdn.com/${name}@latest/${file}

  option:
    # main_css:
    # main:
    # utils:
    # translate:
    # random_friends_post_js:
    # right_click_menu_js:
    # comment_barrage_js:
    # local_search:
    # algolia_js:
    # algolia_search:
    # instantsearch:
    # pjax:
    # blueimp_md5:
    # valine:
    # twikoo:
    # waline_js:
    # waline_css:
    # sharejs:
    # sharejs_css:
    # mathjax:
    # katex:
    # katex_copytex:
    # mermaid:
    # canvas_ribbon:
    # canvas_fluttering_ribbon:
    # canvas_nest:
    # lazyload:
    # instantpage:
    # typed:
    # pangu:
    # fancybox_css:
    # fancybox:
    # medium_zoom:
    # snackbar_css:
    # snackbar:
    # activate_power_mode:
    # fireworks:
    # click_heart:
    # ClickShowText:
    # fontawesome:
    # flickr_justified_gallery_js:
    # flickr_justified_gallery_css:
    # aplayer_css:
    # aplayer_js:
    # meting_js:
    # meting_api:
    # prismjs_js:
    # prismjs_lineNumber_js:
    # prismjs_autoloader:
    # artalk_js:
    # artalk_css:
    # pace_js:
    # pace_default_css:
    # countup_js:
    # gsap_js:
    # busuanzi:
    # rightmenu:
    # waterfall:
    # ali_iconfont_css:
# accesskey_js:| 参数 | 解释 |
|---|---|
| internal_provider | 主题内部文件 可选 local/jsdelivr/unpkg/cdnjs/custom lcoal 为本地加载,custom 为自定义格式,需配置 custom_format注意: 如果使用的是 Dev 版,只能设置为 local |
| third_party_provider | 第三方文件 可选 local/jsdelivr/unpkg/cdnjs/custom lcoal 为本地加载,custom 为自定义格式,需配置 custom_format 注意: 如果你选择 local 则需要自行将文件都下载至本地,并修改对应的选项,否则会报错。 |
| version | true/false 为 cdn 加上指定版本号 |
| custom_format | 自定义格式 |
| option | 你可以在这里更换部分文件,会覆盖原有的配置 |
version
如需修改版本号,可修改主题目录的 'plugins.yml' 中对应插件的 version
请确保你修改的版本号,你所使用的 cdn 有收录
custom_format
提供以下参数
| 参数 | 解释 |
|---|---|
| name | npm 上的包名 |
| file | npm 上的文件路径 |
| min_file | cdnjs 上的包名 |
| cdnjs_file | cdnjs 上的文件路径 |
| min_cdnjs_file | cdnjs 上的文件路径(压缩过的文件) |
| version | 插件版本号 |
部分可用的第三方 CDN 列表
请确保你选择的 CDN 有收录主题使用的第三方插件